# 前言
现在开启 MLIR 学习系列。本篇是跟着 Toy 语言学习 MLIR 的第三篇,主要介绍如何实现通过接口进行通用转换,前述内容请参考【MLIR】跟着 Toy 语言学习 MLIR【1】Toy 语言和 Toy Dialect,【MLIR】跟着 Toy 语言学习 MLIR【2】pattern 匹配和重写。
学习 MLIR 最好的方式还是照着官方教程来,但是只看 MLIR 官网教程,Ch1 到 Ch6,没有基础的话又让人学着有点吃力。现发现好多细节,不看教程认识不到,所以当前内容跟随官网教程。
相关链接: LLVM Project ,MLIR 官方文档,MLIR 官网教程,【编译器】使用 llvm 编译自定义语言【1】构建 AST ,【MLIR】跟着 Toy 语言学习 MLIR【2】pattern 匹配和重写。
作为初学者,错误在所难免,还望不吝赐教。
# 基本简介
官网 Toy 教程 展示了如何将自定义语言 Toy 借助 MLIR 一步步编译为可执行机器码的过程。Toy 是一种简单的自定义语言,为了简便,其所有数据类型定义为 fp64 类型的 Tensor,支持 +/* 操作和 transpose 等有限的操作。
以下是整个编译降级的过程:
Toy txt -> Toy AST -> Toy Dialect -> Affine Dialect -> llvm Dialect -> llvm IR -> 机器码(通过 JIT 编译)
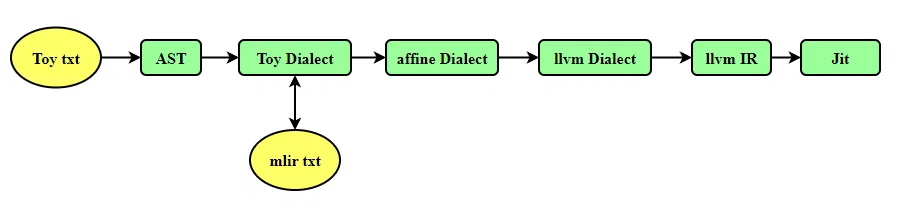
编译过程,下载 github llvm 工程,按照官网编译,值得一提的是,编译整个工具用时太久,我们重点关注 CH* 教程内容,在修改了教程中代码之后,可以只对该部分进行编译:
# 只编译 ch6 | |
ninja -j 4 toyc-ch6 |
编译完成之后,可以执行一些指令进行测试:
# 读取 mlir 到 llvm dialect | |
/your/path/llvm-project/build/bin/toyc-ch6 /your/path/llvm-project/mlir/test/Examples/Toy/Ch5/affine-lowering.mlir -emit=mlir-llvm | |
# 读取 mlir 到 可执行文件 | |
/your/path/llvm-project/build/bin/toyc-ch6 /your/path/llvm-project/mlir/test/Examples/Toy/Ch5/affine-lowering.mlir -emit=jit | |
# 读取 toy 到 toy dialect | |
/your/path/llvm-project/build/bin/toyc-ch6 /your/path/llvm-project/mlir/test/Examples/Toy/Ch6/codegen.toy -emit=mlir | |
# 读取 toy 到 toy dialect opt | |
/your/path/llvm-project/build/bin/toyc-ch6 /your/path/llvm-project/mlir/test/Examples/Toy/Ch6/codegen.toy -emit=mlir -opt | |
# 读取 toy 到 affine dialect | |
/hyour/path/llvm-project/build/bin/toyc-ch6 /your/path/llvm-project/mlir/test/Examples/Toy/Ch6/codegen.toy -emit=mlir-affine | |
# 读取 toy 到 llvm dialect | |
/your/path/llvm-project/build/bin/toyc-ch6 /your/path/llvm-project/mlir/test/Examples/Toy/Ch6/codegen.toy -emit=mlir-llvm |
# 通过接口实现通用转换
MLIR 拥有很多不同层次的方言,就像 Toy Dialect -> Affine Dialect -> llvm Dialect ,尽管这些不同的方言可能代表不同的抽象层次,但通常我们希望对它们执行一组共同的转换和分析操作。然而,如果简单地为每个方言实现各自的转换,会导致大量代码重复,因为内部算法通常非常相似,甚至完全相同。我们希望为转换提供一种能力,可以隐式地与 Toy 等方言挂钩,以获取所需的信息。
【MLIR】跟着 Toy 语言学习 MLIR【2】pattern 匹配和重写中,曾在操作上注册钩子(getCanonicalizationPatterns)来实现一些规范化功能,但这类钩子并不具备良好的可扩展性。因此 MLIR 设计了一种更通用的解决方案 —— 接口,以使 MLIR 基础设施与表示方式一样具有可扩展性。接口为方言和操作提供了通用机制,使其能够为转换或分析提供所需信息。
# 函数内联
Toy 语言除了最初初始化的常量 tensor,其他操作并不知道张量的形状,但是可以通过传递,直到所有形状都可见。
Toy 语言采取的方式是,先将所有函数内联,然后在程序内部推理所有形状。那么第一步是内联,如果专门为 toy dialect 开发一种内联算法,将会非常复杂。幸运的是,MLIR 提供了一个通用的内联器算法,方言可以将其集成使用。在 Toy 中,只需提供内联器能够连接的接口即可。
我们需要定义 Toy 语言方言中内联操作的约束条件。这些信息通过方言接口提供。该接口本质上是一个包含一组虚拟钩子的类,方言可以覆盖这些钩子。在此情况下,接口名为 DialectInlinerInterface。
以下是教程为 toy 方言写的内联接口(DialectInlinerInterface),它告诉 MLIR 框架:“当你要内联 Toy 函数时,请按照我定义的规则来操作。”
/// This class defines the interface for handling inlining with Toy operations. | |
/// We simplify inherit from the base interface class and override | |
/// the necessary methods. | |
struct ToyInlinerInterface : public DialectInlinerInterface { | |
using DialectInlinerInterface::DialectInlinerInterface; | |
/// This hook checks to see if the given callable operation is legal to inline | |
/// into the given call. For Toy this hook can simply return true, as the Toy | |
/// Call operation is always inlinable. | |
bool isLegalToInline(Operation *call, Operation *callable, // 当遇到一个调用的时候,检查是否允许内联 | |
bool wouldBeCloned) const final { | |
return true; // 所有调用都支持内联 | |
} | |
/// This hook checks to see if the given operation is legal to inline into the | |
/// given region. For Toy this hook can simply return true, as all Toy | |
/// operations are inlinable. | |
bool isLegalToInline(Operation *, Region *, bool, // 内联操作 | |
IRMapping &) const final { | |
return true; | |
} | |
/// This hook cheks if the given 'src' region can be inlined into the 'dest' | |
/// region. The regions here are the bodies of the callable functions. For | |
/// Toy, any function can be inlined, so we simply return true. | |
bool isLegalToInline(Region *dest, Region *src, bool wouldBeCloned, // 内联区域 | |
IRMapping &valueMapping) const final { | |
return true; | |
} | |
/// This hook is called when a terminator operation has been inlined. The only | |
/// terminator that we have in the Toy dialect is the return | |
/// operation(toy.return). We handle the return by replacing the values | |
/// previously returned by the call operation with the operands of the | |
/// return. | |
void handleTerminator(Operation *op, | |
ValueRange valuesToRepl) const final { | |
// Only "toy.return" needs to be handled here. | |
auto returnOp = cast<ReturnOp>(op); | |
// Replace the values directly with the return operands. | |
assert(returnOp.getNumOperands() == valuesToRepl.size()); | |
for (const auto &it : llvm::enumerate(returnOp.getOperands())) | |
valuesToRepl[it.index()].replaceAllUsesWith(it.value()); | |
} | |
}; |
代码中,调用,区域,操作,三种都支持内联。其中区域、操作的内联可能更靠近底层,所以我们先不管。 handleTerminator 是其中最核心的方法,其设定了当内联发生时,处理被内联函数的终结符(Terminator),也就是 toy.return 。
举个例子:
// 被内联的函数 | |
toy.func @foo(%arg: f64) -> f64 { | |
%0 = toy.mul %arg, %arg : f64 | |
toy.return %0 : f64 ← 终结符 | |
} | |
// 调用点 | |
toy.func @main() { | |
%result = toy.generic_call @foo(%arg) : ... -> f64 | |
} |
内联之后:
1. MLIR 将 @foo 的代码复制到 @main 中。 | |
2. 被复制的代码中有 toy.return %0。 | |
3. handleTerminator 被调用: | |
- returnOp = %0 | |
- valuesToRepl = [%result](调用点的结果值) | |
4. valuesToRepl[0].replaceAllUsesWith(%0) | |
→ 所有使用 %result 的地方都被替换为 %0 | |
5. toy.return 被移除 |
还有一些需要的额外操作,比如需要将除 main 函数之外的调用标记为 private ,那么 main 函数将会是默认的 public 。这样能避免内联器将 main 函数内联(内联器会谨慎处理 public 函数),同时标记为 private 的函数,能够内联,且如果没有被调用的话,会被内联器丢掉。
/// Emit a new function and add it to the MLIR module. | |
mlir::toy::FuncOp mlirGen(FunctionAST &funcAST) { | |
... | |
// If this function isn't main, then set the visibility to private. | |
if (funcAST.getProto()->getName() != "main") | |
function.setPrivate(); | |
return function; | |
} |
以下是 toy 方言注册该接口:
void ToyDialect::initialize() { | |
addInterfaces<ToyInlinerInterface>(); | |
} |
但是现在还有一个问题,MLIR 不知道 toy.func 是个函数,也不知道 toy.generic_call 是个调用,所以在定义 FuncOp 和 GenericCallOp 的时候,需要为他们做标记,让 MLIR 识别到这两种操作:
def FuncOp : Toy_Op<"func", | |
[FunctionOpInterface, IsolatedFromAbove]> { // 添加 FunctionOpInterface 特性 | |
... | |
} | |
def GenericCallOp : Toy_Op<"generic_call", | |
[DeclareOpInterfaceMethods<CallOpInterface>]> { // 添加 DeclareOpInterfaceMethods 特性 | |
... | |
} |
可以看到这两个特性的添加方式不太一样。
其中 FunctionOpInterface 是一个 “虚接口”。它声明了需要实现的方法,但不会自动生成任何代码。开发者需要自己在 extraClassDeclaration 中手写实现。extraClassDeclaration 中可以添加任何自定义函数,通过查阅 FunctionOpInterface 的文档可以知道需要实现哪些虚函数。
所以在 Ops.td 文件的 FuncOp 定义中,有下面的内容:
def FuncOp : Toy_Op<"func", [FunctionOpInterface, IsolatedFromAbove]> { | |
// ... | |
let extraClassDeclaration = [{ | |
ArrayRef<Type> getArgumentTypes() { return getFunctionType().getInputs(); } | |
ArrayRef<Type> getResultTypes() { return getFunctionType().getResults(); } | |
Region *getCallableRegion() { return &getBody(); } | |
}]; | |
} |
而 CallOpInterface 是一个 “声明式接口”。使用 DeclareOpInterfaceMethods<CallOpInterface> 告诉 ODS:“请自动生成 CallOpInterface 需要的所有方法的声明。” 当在 ODS 中使用 DeclareOpInterfaceMethods 时,你不仅声明了接口,也承诺了要为该接口提供的必要字段,即参数属性和结果属性 argument and result attributes 。
在 GenericCallOp 操作定义中能找到:
let arguments = (ins | |
... | |
OptionalAttr<DictArrayAttr>:$arg_attrs, // 参数属性 | |
OptionalAttr<DictArrayAttr>:$res_attrs // 结果属性 | |
); |
之后通过调用 inline pass,能够实现 toy dialect 的内联:
pm.addPass(mlir::createInlinerPass()); |
但这时候仍然没有实现内联,我们命令行里增加 -opt 之后, 得到的仍然是没有内联的代码,如下:
toy.func @multiply_transpose(%arg0: tensor<*xf64>, %arg1: tensor<*xf64>) -> tensor<*xf64> { | |
%0 = toy.transpose(%arg0 : tensor<*xf64>) to tensor<*xf64> | |
%1 = toy.transpose(%arg1 : tensor<*xf64>) to tensor<*xf64> | |
%2 = toy.mul %0, %1 : tensor<*xf64> | |
toy.return %2 : tensor<*xf64> | |
} | |
toy.func @main() { | |
%0 = toy.constant dense<[[1.000000e+00, 2.000000e+00, 3.000000e+00], [4.000000e+00, 5.000000e+00, 6.000000e+00]]> : tensor<2x3xf64> | |
%1 = toy.reshape(%0 : tensor<2x3xf64>) to tensor<2x3xf64> | |
%2 = toy.constant dense<[1.000000e+00, 2.000000e+00, 3.000000e+00, 4.000000e+00, 5.000000e+00, 6.000000e+00]> : tensor<6xf64> | |
%3 = toy.reshape(%2 : tensor<6xf64>) to tensor<2x3xf64> | |
%4 = toy.generic_call @multiply_transpose(%1, %3) : (tensor<2x3xf64>, tensor<2x3xf64>) -> tensor<*xf64> | |
%5 = toy.generic_call @multiply_transpose(%3, %1) : (tensor<2x3xf64>, tensor<2x3xf64>) -> tensor<*xf64> | |
toy.print %5 : tensor<*xf64> | |
toy.return | |
} |
原因在于,"内联前的类型不匹配",调用点 %4 = toy.generic_call @multiply_transpose(%1, %3) 这里,两个输入参数 (tensor<2x3xf64>, tensor<2x3xf64>) -> tensor<*xf64> 是具体形状,而 toy 的函数定义是 “泛型” 的,这个函数 toy.func @multiply_transpose 在方言中, (%arg0: tensor<*xf64>, %arg1: tensor<*xf64>) -> tensor<*xf64> 输入输出都是未定型,InlinerPass 在遇到这种类型不匹配时,会拒绝内联。
为了消除这种类型不匹配,我们需要一种显式的类型转换操作,toy.cast。(在此之前 toy 语言中没有显示使用过类型转换 Cast)
def CastOp : Toy_Op<"cast", [ | |
DeclareOpInterfaceMethods<CastOpInterface>, // 增加一个 CastOpInterface 特性 | |
Pure, | |
SameOperandsAndResultShape] | |
> { | |
let summary = "shape cast operation"; | |
let description = [{ | |
The "cast" operation converts a tensor from one type to an equivalent type | |
without changing any data elements. The source and destination types | |
must both be tensor types with the same element type. If both are ranked, | |
then shape is required to match. The operation is invalid if converting | |
to a mismatching constant dimension. | |
}]; | |
let arguments = (ins F64Tensor:$input); | |
let results = (outs F64Tensor:$output); | |
let assemblyFormat = "$input attr-dict `:` type($input) `to` type($output)"; | |
} |
它的作用:将一个张量从一种类型转换为另一种类型,而不改变数据本身。可以看到特性列表中增加了一个 CastOpInterface 接口。通过提供 areCastCompatible 方法的定义来钩入此接口
/// Returns true if the given set of input and result types are compatible with | |
/// this cast operation. This is required by the `CastOpInterface` to verify | |
/// this operation and provide other additional utilities. | |
bool CastOp::areCastCompatible(TypeRange inputs, TypeRange outputs) { | |
if (inputs.size() != 1 || outputs.size() != 1) // 只接受一个输入和一个输出,否则不合法 | |
return false; | |
// The inputs must be Tensors with the same element type. | |
TensorType input = llvm::dyn_cast<TensorType>(inputs.front()); // 强制转换为 TensorType 类型 | |
TensorType output = llvm::dyn_cast<TensorType>(outputs.front()); | |
if (!input || !output || input.getElementType() != output.getElementType()) | |
return false; //input 或 output 不是 tensor 类型,不合法;两者类型不同,不合法 | |
// The shape is required to match if both types are ranked. | |
return !input.hasRank() || !output.hasRank() || input == output; // 有一个是未定型,合法;都是具体类型,且形状相同,合法 | |
} |
areCastCompatible 是 CastOpInterface 要求实现的核心验证方法,它定义了 “什么样的类型转换是合法的”。我在代码中注释了转换合法的情况。
该 CastOp 只定义了 “什么是合法的转换”,但并不决定 “什么时候转换” 或 “转换的方向”,具体从哪里转到哪里,由调用者决定。也就是内联器来调用该转换。
ToyInlinerInterface 中还需要重写一个函数 : materializeCallConversion 来创建 CastOp。
struct ToyInlinerInterface : public DialectInlinerInterface { | |
... | |
/// Attempts to materialize a conversion for a type mismatch between a call | |
/// from this dialect, and a callable region. This method should generate an | |
/// operation that takes 'input' as the only operand, and produces a single | |
/// result of 'resultType'. If a conversion can not be generated, nullptr | |
/// should be returned. | |
Operation *materializeCallConversion(OpBuilder &builder, Value input, | |
Type resultType, | |
Location conversionLoc) const final { | |
return CastOp::create(builder, conversionLoc, resultType, input); | |
} | |
}; |
做完以上共奏,再进行 inline 操作,内联结果如下。
toy.func @main() { | |
%0 = toy.constant dense<[[1.000000e+00, 2.000000e+00, 3.000000e+00], [4.000000e+00, 5.000000e+00, 6.000000e+00]]> : tensor<2x3xf64> | |
%1 = toy.constant dense<[[1.000000e+00, 2.000000e+00, 3.000000e+00], [4.000000e+00, 5.000000e+00, 6.000000e+00]]> : tensor<2x3xf64> | |
%2 = toy.cast %1 : tensor<2x3xf64> to tensor<*xf64> | |
%3 = toy.cast %0 : tensor<2x3xf64> to tensor<*xf64> | |
%4 = toy.transpose(%2 : tensor<*xf64>) to tensor<*xf64> | |
%5 = toy.transpose(%3 : tensor<*xf64>) to tensor<*xf64> | |
%6 = toy.mul %4, %5 : tensor<*xf64> | |
toy.print %6 : tensor<*xf64> | |
toy.return | |
} |
# Infer Shape
Shape Inference 逻辑不应该被 “硬编码” 在一个特定的 Pass 里,而应该通过定义接口(Interface),让每个操作自己提供形状推断的方法。这样,当其他方言也有形状推断需求时,就可以直接复用这个接口.(当然,实际的推理逻辑还是要重新写。)
该接口通过继承 OpInterface 来定义,其中 OpInterface 以模板参数的形式接收生成的 C++ 接口类的名称。对于我们的目的,我们将直接将生成的类命名为 ShapeInference 。
def ShapeInferenceOpInterface : OpInterface<"ShapeInference"> { // 定义一个接口,继承 OpInterface 类 | |
let description = [{ // 函数描述 | |
Interface to access a registered method to infer the return types for an | |
operation that can be used during type inference. | |
}]; | |
let methods = [ // 定义继承接口之后需要实现的方法 | |
InterfaceMethod<"Infer and set the output shape for the current operation.", | |
"void", "inferShapes"> // <"方法描述", "返回值类型", "方法名称"> | |
]; | |
} |
上述 ODS 描述,会生成一个名字为 ShapeInference 的接口类,继承 OpInterface<ShapeInference> ,期定义的虚函数函数名称是 inferShapes ,返回值类型是 void。 生成的 代码大概是下面这个样子。
class ShapeInference : public OpInterface<ShapeInference> { | |
public: | |
virtual void inferShapes() = 0; // 纯虚函数 | |
}; |
现在接口类已经定义好,下面就是在定义算子的时候,必要的算子继承该接口,以实现 shape 推理。继承了接口,每个这样的算子就要实现 inferShapes() 函数
def MulOp : Toy_Op<"mul", | |
[..., DeclareOpInterfaceMethods<ShapeInferenceOpInterface>]> { | |
... | |
} | |
/// Infer the output shape of the MulOp, this is required by the shape inference | |
/// interface. | |
void MulOp::inferShapes() { getResult().setType(getLhs().getType()); } |
接下来定义 Pass
class ShapeInferencePass | |
: public mlir::PassWrapper<ShapeInferencePass, OperationPass<FuncOp>> { | |
void runOnOperation() override { | |
FuncOp function = getOperation(); | |
... | |
} | |
}; |
该 Pass 继承了 继承 OperationPass<FuncOp> ,是因为这是一个函数级别的 Pass,它会在每个 FuncOp 上独立运行,(因为 shape infer 是函数内的优化), runOnOperation 是 Pass 的入口,MLIR 框架会在应用 Pass 时调用它。
runOnOperation 中的操作逻辑是:
1. 构建工作队列:包含所有返回动态形状张量的操作 | |
2. 迭代处理: | |
a. 找到下一个“就绪”的操作(所有参数都已确定形状) | |
b. 如果没有找到,退出循环 | |
c. 从工作队列中移除该操作 | |
d. 从其参数类型推断输出形状 | |
3. 如果工作队列为空,算法成功 |
创建一个构建该 pass 的帮助函数:
std::unique_ptr<mlir::Pass> mlir::toy::createShapeInferencePass() { | |
return std::make_unique<ShapeInferencePass>(); | |
} |
在降级过程中调用该 pass:
pm.addPass(mlir::createShapeInferencePass()); |
最终结果:
toy.func @main() { | |
%0 = toy.constant dense<[[1.000000e+00, 2.000000e+00, 3.000000e+00], [4.000000e+00, 5.000000e+00, 6.000000e+00]]> : tensor<2x3xf64> | |
%1 = toy.transpose(%0 : tensor<2x3xf64>) to tensor<3x2xf64> | |
%2 = toy.mul %1, %1 : tensor<3x2xf64> | |
toy.print %2 : tensor<3x2xf64> | |
toy.return | |
} |
# 后记
好结局:旅途仍在继续,你仍然未寻找到那个终局性的、有关幸福的答案,然而,偶然间,你在路边发现了一道夕阳。 | |
—— meme |
本博客目前以及可预期的将来都不会支持评论功能。各位大侠如若有指教和问题,可以在我的 github 项目 或随便一个项目下提出 issue,并指明哪一篇博客,看到一定及时回复!